JuDoor Documentation
User Portal JuDoor
JSC provides the users with a single interface to the supercomputers and other services and therefore introduced a user portal called JuDoor.
All users can get access to the portal and can manage their personal data, as well as their account and project memberships via JuDoor. A big advantage: account creation on an SC systems will be performed in minutes, because we offer a full online process including the user and the project s principle investigatoar (PI), no paper handling is required.
Please consider that JuDoor is the only way to get accounts on the JSC systems. PIs can manage their project members online themselves, they also have the possibility to assign a project administrator (PA) who can manage the account handling for them. The PA announcement can also be done in the portal itself, but requires a signed form of the PA.
Access to JuDoor
You can find JuDoor here: JuDoor.
Usage
Here we will describe the usage of the portal.
Getting portal account and login
New users can apply for an account via the portal, this is done via "register" at the login page. An email callback is used to verify the user.
Also a password reset can be performed here.
Users can login to the portal with their portal account and password. It is also possible to login via the email address registered at JSC.

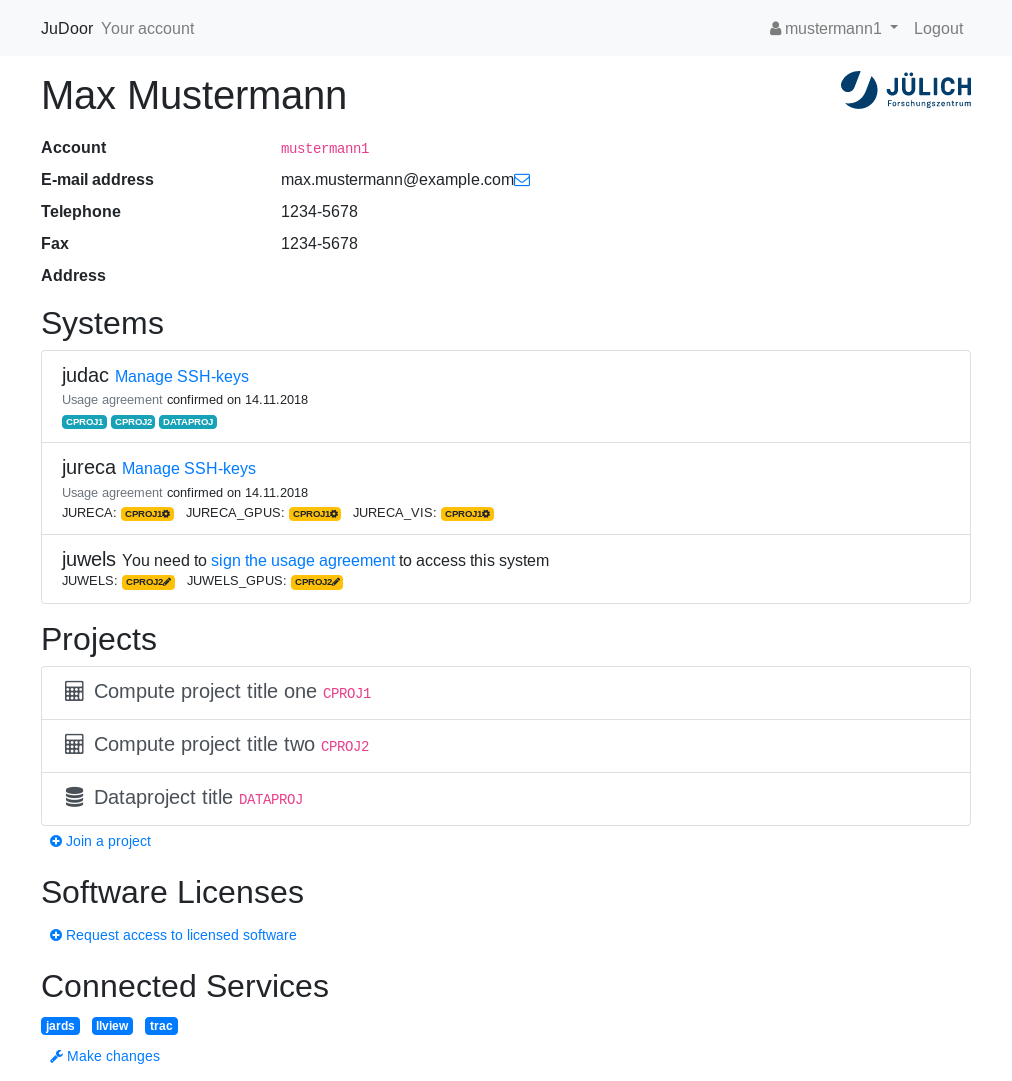
User view
After Login you see an overview of your resources and you have the possibility to perform actions on them:
- Personal data
You can also change your personal data here. - Systems to which you have access
It is possible here to upload ssh-keys and to sign user agreements of the systems - Projects you are member of
You can click on the projects to get more details and to perform actions on the project. - Software
You can ask for access to licensed/restricted software here. - Other connected services
You can see and change further webservices assigned to you.
Getting HPC account
A user can apply for access to a project which is known to him by specifying the project id. The request for project membership is sent to the PI, the PI is informed via email and can find the request in the portal itself. The PI can accept or deny the request and also assigns which HPC systems the user can access in the project.
Just click on "Join a project" to start the request for the PI.
A user can also request an additional resource in a project in which he is already member: click on the project and afterwards on "request access for resources", choose the resource you would like to access and click on "Inform PIs and PAs about your request". An email will be sent to the PI/PA so that your request can be approved.
View of Principle Investigators and Project Administrators
PIs and PAs can see all users in their project and which systems are assigned to them. It is also possible for them to delete a person from the project or a single resource. Also an overview about Storage and CPU resources on the systems is provided.
Join of a user to a project
The PI can invite a user to the project via the Invite URL above the user's list. Just send the link to the dedicated users.

In case a user wants to join the PI's project the PI/PA can see the request in the portal, but the PI/PA is also informed via email: a direct link in the email leads the PI/PA to the request in JuDoor. Here, the PI/PA can add the user to the project and assign HPC systems to the user.
The PI can also reject a request from a user to join the project. If the user is to be admitted later this can be done via "Show rejected users" in the project view below the users's list.
A user can also ask for getting access to a project via "Join a project" on the start page instead of being invited. In this case the project id needs to be known. Further steps are as described.
Add an additional resource to a user in a project
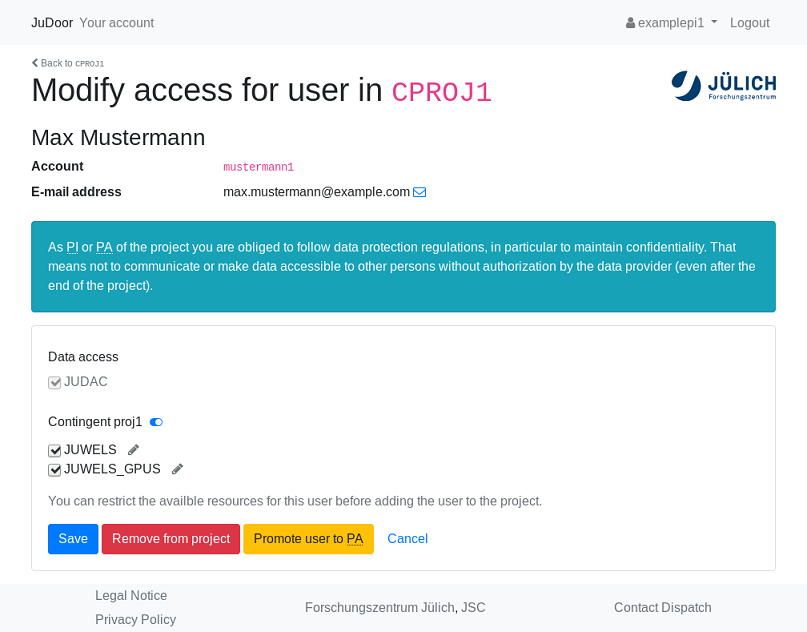
A user can request for an additional resource even when he is already member of the project. The PI/PA gets an email about the request: a direct link in the email leads the PI/PA to the request in JuDoor. Here, the PI/PA can approve the requested resources (or parts of the resources) by clicking on "save".
It is not mandatory that the user requests the resource via JuDoor. The PI/PA can also add an additional resource to the user by clicking on the modify-icon of that account in the user's list, select the desired resource, and save finally.
Deletion of a user from a project or from project resources
The PI/PA can completely delete a user from the project: The PI/PA needs to click on the modify-icon for the user in the users's list of the project and afterwards on "Remove from project". The user will have no access anymore to the project data and compute resources. The access-rights of the data which was still stored in project directories with uid of the user will be changed to the uid of the PI.
The PI/PA can also just remove access to some or all compute resources: The PI/PA needs to click on the modify-icon for the user in the users's list of the project and afterwards deactivate resources and press "save". The user stays member of the project, even if all compute resources have been revoked, the user can still access the data of the project.
Bulk modify
The above changes, e.g. adding or deleting resources from users, can also be done for several users in one step via "Bulk modify" below the user's list.
Announcement of a Project Administrator
The PI is responsible to manage the users working for his project, i.e. approving or denying access to the project and assigning compute resources. But this responsibility can be transferred additionally to a second person, called project administrator. This can be done via the portal itself by the PI, the future PA gets via email a form which has to be signed and send to the user administration (dispatch) at JSC, address please see below.
To announce a user as PA in the portal the PI needs to click on the modify-icon for the user in the user's list of the project and afterwards on Promote user to PA.
This needs to be approved on the next screen "Appoint as PA".
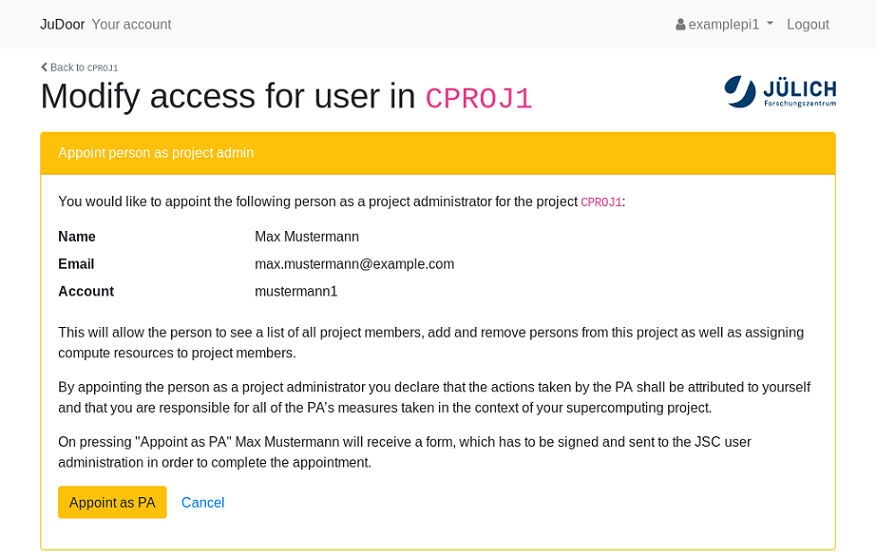
Afterwards the email will be sent to the future PA automatically.
Extended Statistics
PIs/PAs can also see detailed usage statistics via "Show extended statistics" on a project page. You will be leaded to the tool JSC KontView.
JuDoor MFA
What is MFA
Multifactor authentication (MFA) is an additional measure to secure your account. This is done by requiring a secondary authentication factor that is not a password.
The second factor is a 6-digit number, which is automatically generated with a secret key that is stored in an App running on a second device (e.g. your mobile phone), and which changes every 30 seconds. Because the valid code changes so regularly and is only valid for a short amount of time, it is harder for malicious actors to steal it and it is not vulnerable to password reuse or other dictionary attacks.
This is referred to as “Time based one time passwords” (TOTP).
Be aware that MFA does not protect you if your second device is hacked, or if you enter the code into a phishing site.
Enabling MFA
To enable MFA in JuDoor please navigate to the “Account Security” page by clicking the fingerprint icon in the navigation bar or using the Account dropdown menu.

Here you see a list of your accounts. You can start the setup process using the “Start MFA Setup…” Button.

On this page you can find our recommendations for TOTP Apps to use, but any other TOTP App should probably work just as well.
You will need to install a compatible App, scan the QR-Code with the App to add the account, and then insert into the form both your current password and the code the app generates.
After pressing “Continue…” you will be presented with 10 reset codes. These can be used to disable MFA again in case you lose access to your second factor.

You should save these at a secure location or print them.
MFA will be enabled for your account only after you have confirmed that you have saved these reset codes.
MFA is now enabled. The Fingerprint Icon in the Navigation bar now shows your MFA authentication state. Because you have just entered a valid code, you are MFA authenticated and can continue to use JuDoor as normal.
The MFA authentication expires after 24 hours or if you open JuDoor from a different browser/device or clear your cookies.
The following actions are secured by MFA in JuDoor and therefore a valid token is needed:
- Joining a project
- Adding an SSH Key
- Removing an SSH Key
- Changing someone’s access in a project if you are a PI or PA
Actions that require TOTP are marked with a Fingerprint Icon.
Securing SSH with MFA
After you have enabled MFA for your account, you can additionally enable it to also protect your SSH logins to our HPC systems by visiting the “Account Security” page and clicking the “Enable MFA for SSH” button.
You will then be prompted to enter the MFA code when logging into our HPC systems with SSH.